Introduction
Welcome to the Intermediate Docker Guide! If you have a basic understanding of Docker and are looking to enhance your skills, this guide is perfect for you. We will explore more advanced Docker concepts that are crucial for building efficient, scalable, and secure containerized applications.
If you are new to Docker or need a refresher, I recommend checking out my previous blog, “Docker for Beginners: Your Ultimate Guide to Understanding and Using Containers.” Once you have a solid grasp of the basics, you can continue with this intermediate guide to further deepen your Docker knowledge.
Topics Covered
| Topic | Description |
|---|---|
| Docker Network (Bridge, Host, None) | Understanding the different networking modes in Docker and their use cases. |
| Creating Custom Networks | How to set up and use custom Docker networks for better control and security. |
| Docker Volumes | Persisting data across container lifecycles using Docker volumes. |
| Efficient Caching in Docker Layers | Advanced techniques for optimizing Dockerfile structures and build times. |
| Docker Multistage Builds | Building lean and efficient Docker images in multiple stages. |
Let’s dive into each of these topics to expand your Docker expertise and optimize your containerized applications!
Docker Network (Bridge, Host, None)
In the journey of mastering Docker, understanding Docker networking is crucial. As applications grow in complexity, so does the need for efficient, secure, and scalable communication between containers. This section delves into Docker’s networking options, providing real-life scenarios, detailed explanations, and well-documented examples.
The Problem: Communication Between Containers
Imagine you’re a developer working on a multi-service application. Your setup includes:
- A web server container to handle client requests.
- A database container for storing application data.
- A cache container to speed up data retrieval.
Initially, you might run each service on your local machine. But as you shift to a containerized environment, ensuring these containers can communicate effectively becomes a challenge. Without proper networking, your containers can’t talk to each other, making the setup incomplete and inefficient.
Understanding Docker Networking Modes
Docker offers three primary networking modes: Bridge, Host, and None. Each mode serves different use cases and offers varying degrees of isolation and connectivity.
1. Bridge Network (Default)
The Bridge network is Docker’s default networking mode. It connects containers on the same host to a virtual network bridge, allowing them to communicate with each other while being isolated from the host network.
- Scenario: You want your web server to connect to your database without exposing the database to the outside world.
- How It Works: Containers are assigned IP addresses on the bridge network and can communicate with each other using these addresses.
Example:
To expose your web server on port 8080 of the host, you would use port mapping:
docker run -d -p 8080:80 my_web_server-d: Run container in detached mode.-p 8080:80: Map port 80 in the container to port 8080 on the host.
This setup allows external users to access the web server using the host’s IP address and port 8080. Now, let’s consider a scenario where your web server needs to communicate with a database container.
Example of Communication Between Containers:
1. Start a database container on the default bridge network:
docker run -d --name my_db postgres-d: Run the container in detached mode.--name my_db: Name the containermy_db.postgres: Use the official PostgreSQL image.
2. Start a web server container on the same network:
docker run -d --name my_web_server nginx-d: Run the container in detached mode.--name my_web_server: Name the containermy_web_server.nginx: Use the official NGINX image.
3. Inside the web server container, connect to the database using its container name as the hostname:
   docker exec -it my_web_server bash
   ping my_db
docker exec -it my_web_server bash: Open an interactive bash shell in themy_web_servercontainer.ping my_db: Ping themy_dbcontainer to verify connectivity.
In this setup, both containers are connected to the default bridge network and can communicate using their container names as hostnames.
Real-Life Example: Using Bridge Network in Production
Imagine you are developing a microservices-based e-commerce application. Your application consists of the following services:
- Web Server: Handles client requests.
- Database: Stores product and user information.
- Cache: Speeds up data retrieval.
You want these services to communicate with each other while keeping them isolated from the host network. Here’s how you can set up and connect these services using Docker’s Bridge network.
Step-by-Step Implementation
1. Create a Bridge Network:
docker network create ecommerce_network2. Run the Database Container:
docker run -d --name ecommerce_db --network ecommerce_network -e POSTGRES_USER=admin -e POSTGRES_PASSWORD=secret -e POSTGRES_DB=ecommerce postgres:latest-d: Run the container in detached mode.--name ecommerce_db: Name the containerecommerce_db.--network ecommerce_network: Connect the container toecommerce_network.-e POSTGRES_USER=admin -e POSTGRES_PASSWORD=secret -e POSTGRES_DB=ecommerce: Set environment variables for the PostgreSQL database.
3. Run the Cache Container:
docker run -d --name ecommerce_cache --network ecommerce_network redis:latest-d: Run the container in detached mode.--name ecommerce_cache: Name the containerecommerce_cache.--network ecommerce_network: Connect the container toecommerce_network.
4. Run the Web Server Container:
docker run -d --name ecommerce_web --network ecommerce_network -p 8080:80 -e DB_HOST=ecommerce_db -e DB_USER=admin -e DB_PASSWORD=secret -e DB_NAME=ecommerce -e CACHE_HOST=ecommerce_cache nginx:latest-d: Run the container in detached mode.--name ecommerce_web: Name the containerecommerce_web.--network ecommerce_network: Connect the container toecommerce_network.-p 8080:80: Map port 80 in the container to port 8080 on the host.-e DB_HOST=ecommerce_db -e DB_USER=admin -e DB_PASSWORD=secret -e DB_NAME=ecommerce -e CACHE_HOST=ecommerce_cache: Set environment variables for connecting to the database and cache. Here,DB_HOSTis set to the name of the database containerecommerce_db, andCACHE_HOSTis set to the name of the cache containerecommerce_cache.
5. Connecting the Web Server to the Database and Cache:
In your web server application (e.g., a Node.js app), you would connect to the database and cache using the environment variables provided.
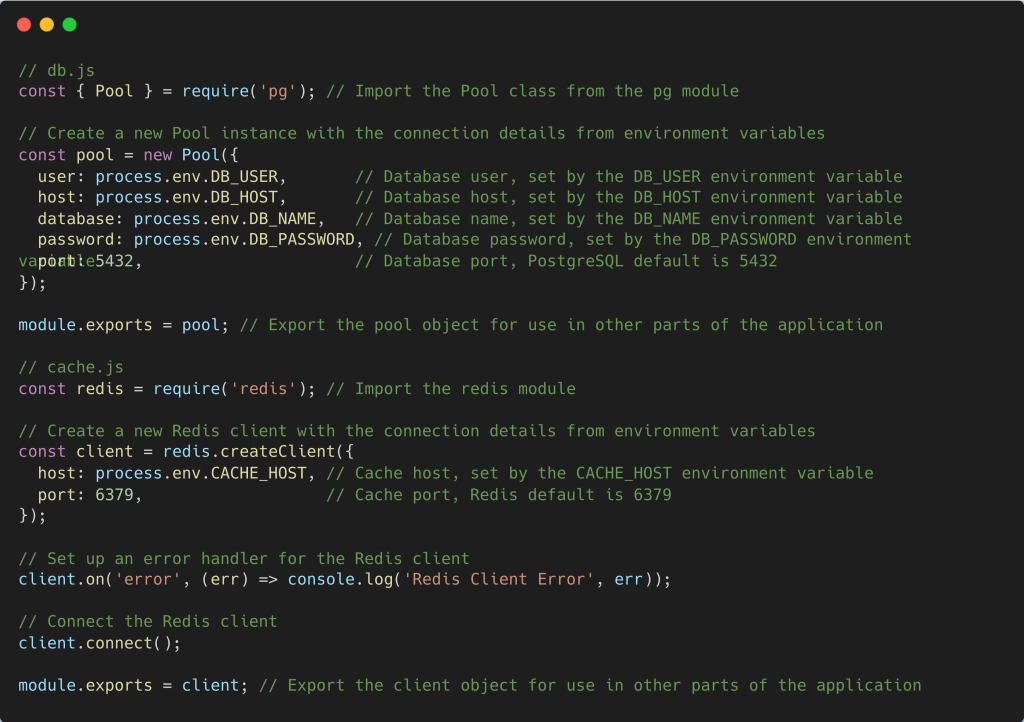
In your web server application, you can now use these modules to interact with the database and cache.
This setup demonstrates how to use Docker’s Bridge network to connect multiple services in a micro-services architecture. Each service runs in its own container and communicates securely through the custom bridge network, ensuring efficient and isolated communication.
2. Host Network
The Need for High-Performance Network Communication
Imagine you are developing an online multiplayer game server. Multiplayer games require low-latency, high-speed communication between the server and the clients to ensure smooth gameplay. In this scenario, network performance is critical, and any delay can significantly impact the user experience.
Let’s say you’re working on a game server that needs to handle thousands of concurrent players. The server should communicate efficiently with clients over the internet, and you want to minimize the overhead introduced by network isolation layers.
While Docker’s default bridge network mode is suitable for many applications, it introduces some network overhead because containers communicate through a virtual bridge. For applications like game servers, this overhead can be problematic.
Enter Host Network Mode
In Host network mode, a container shares the host’s network stack. This mode offers the highest performance because it eliminates network isolation between the container and the host. By using the host’s network interfaces directly, you can achieve near-native network performance, which is ideal for latency-sensitive applications like game servers.
Scenario: You need high-performance network communication for your application, such as a game server.
How It Works: The container uses the host’s IP address and network interfaces directly, meaning no port mapping is needed. This direct access reduces latency and improves performance.
Example:
To run a container using the host network:
docker run -it --network=host my_app--network=host: Use the host network.
Difference Between Bridge and Host Network Modes
Bridge Network:
- Requires port mapping to expose services.
- Containers communicate through a virtual bridge.
- Example command:
docker run -d -p 8080:80 my_web_server.
Host Network:
- Uses the host’s network directly, no port mapping required.
- Containers share the host’s IP address and network interfaces.
- Example command:
docker run -d --network=host my_game_server.
How It Works in Practice
By using the host network mode, the container is directly accessible on the host’s network. This means that if your game server application listens on port 3000, it will be accessible on port 3000 of the host machine’s IP address. There’s no need for port mapping, as the container uses the same network stack as the host.
3. None Network
In None network mode, the container has no network interfaces apart from the loopback interface. This means the container is completely isolated from any network.
- Scenario: Running a containerized batch job that does not require network access.
- How It Works: The container cannot send or receive any network traffic.
Example:
To run a container with no network:
docker run -it --network=none my_app--network=none: Disable all networking for the container.
This mode is useful for tasks that don’t require any network connectivity, such as running isolated scripts or batch processing jobs.
Creating Custom Networks
As you develop more complex applications with Docker, the default bridge network might not provide the level of control and flexibility you need. Custom networks allow you to define how containers communicate with each other securely, without exposing unnecessary ports. This is particularly useful for microservices architectures where different services need to interact frequently.
The Problem: Communication and Security in Multi-Service Applications
Imagine an e-commerce application with multiple services:
- Web Server: Handles incoming HTTP requests.
- Database: Stores user and product data.
- Payment Gateway: Processes payments.
- Notification Service: Sends email notifications.
Using the default bridge network can lead to issues like lack of isolation, management challenges, and security concerns.
The Solution: Custom Docker Networks
Creating custom networks allows you to isolate and control inter-service communication, ensuring a robust and secure architecture. Custom networks enable you to:
- Isolate Services: Ensure only specific containers can communicate with each other.
- Enhance Security: Limit exposure of internal services.
- Improve Network Management: Group related services together.
Creating a Custom Bridge Network
Creating a custom bridge network gives you greater control over the network configuration and improves container communication.
Example Scenario: Setting Up a Custom Network for an E-commerce Application
Step 1: Create a Custom Bridge Network
docker network create -d bridge my_custom_network- Creates a network named
my_custom_networkusing the bridge driver.
Step 2: Run Containers on the Custom Network
# Run the database container
docker run -d --network=my_custom_network --name ecommerce_db postgres:latest

# Run the payment gateway container
docker run -d --network=my_custom_network --name payment_gateway payment_gateway_image

# Run the notification service container
docker run -d --network=my_custom_network --name notification_service notification_service_image

# Run the web server container
docker run -d --network=my_custom_network --name web_server -p 8080:80 web_server_image- Connects each container to
my_custom_networkand names them for easier management.
Step 3: Verify Connectivity
To ensure that the containers can communicate with each other, you can use the ping command inside one of the containers.
# Access the web server container
docker exec -it web_server bash

# Inside the web server container, ping the database container
ping ecommerce_db
docker exec -it web_server bash: Opens an interactive bash shell inside theweb_servercontainer.ping ecommerce_db: Pings theecommerce_dbcontainer to verify network connectivity.
Viewing Docker Networks
To manage and view all available Docker networks, use the following command:
docker network ls- This command lists all Docker networks, including the default and custom networks.
Docker Volumes
The Need for Docker Volumes
In the world of Docker, containers are designed to be ephemeral, meaning their data doesn’t persist when they are destroyed or recreated. This design works well for stateless applications, but what if you need to preserve data? For instance:
- Persistent Data Storage: When a container is destroyed, all data inside it is lost.
- Resuming Work: You may want to resume work from where you left off after a container is destroyed and recreated.
- Data Sharing: Share data between the host and the container or between multiple containers.
The Solution: Docker Volumes
Docker volumes provide a way to persist data generated or used by Docker containers. Volumes are stored outside the container’s filesystem, on the host machine, ensuring data remains intact even if the container is removed.
Volume Mapping
Volume mapping allows you to mount a directory from the host machine into a container. This way, any changes made to the directory inside the container are reflected on the host machine and vice versa.
Example:
To run a container and mount a local directory into the container:
docker run -it -v /path/on/host:/path/in/container ubuntu-it: Run the container in interactive mode with a TTY.-v /path/on/host:/path/in/container: Mounts/path/on/hostfrom the host into/path/in/containerin the container.
Explanation:
- This command mounts a local folder from the host (e.g., your MacBook) into the container. Changes made to the folder in the container will be reflected on the host and vice versa.
Creating Custom Volumes
Instead of specifying paths each time, Docker allows you to create named volumes. Named volumes are easier to manage and reuse across multiple containers.
Example:
To create a custom volume:
docker volume create my_volumemy_volume: The name of the custom volume.
Explanation:
- This command creates a volume named
my_volumethat Docker manages.
Listing Volumes:
To list all Docker volumes:
docker volume lsExplanation:
- This command lists all available Docker volumes, including their names and drivers.
Using Custom Volumes (Mounting)
To use the custom volume created earlier, you mount it when running a container.
Example:
To run a container and mount the custom volume:
docker run -it --mount source=my_volume,target=/data ubuntu--mount source=my_volume,target=/data: Mounts themy_volumevolume into the/datadirectory inside the container.
Explanation:
- This command starts a container, mounts the
my_volumevolume, and makes it accessible at/datainside the container. Any data written to/datawill persist inmy_volume, even if the container is destroyed.
Docker volumes are essential for persisting data across container lifecycles. By using volume mapping and custom volumes, you can ensure that your data is not lost when containers are destroyed. This capability is especially important for applications that require data persistence, such as databases, content management systems, and development environments.
Efficient Caching in Docker Layers (Advanced)
In our previous blog, we covered the basics of Docker layer caching and the importance of ordering commands to optimize caching. Now, let’s delve deeper into more advanced techniques, such as minimizing the number of layers and preparing for multi-stage builds, which we will discuss in the next section.
The Problem: Inefficient Layer Management
When building Docker images, each command in your Dockerfile creates a new layer. If these layers are not managed efficiently, it can lead to longer build times and larger image sizes. Inefficient layer management often results from:
- Using too many layers for tasks that could be combined.
- Failing to leverage Docker’s caching mechanism effectively.
- Including unnecessary files in the build context.
Advanced Techniques for Efficient Layer Caching
1. Minimize the Number of Layers
Combining multiple commands into a single layer can reduce the overall number of layers in your image, leading to smaller and faster builds. However, it’s important to balance this with the readability and maintainability of your Dockerfile.
Example: Combining Commands
Instead of writing:
RUN apt-get update
RUN apt-get install -y curl
RUN apt-get clean
Combine these into a single RUN statement:
RUN apt-get update && apt-get install -y curl && apt-get cleanExplanation:
- Combining commands into a single
RUNinstruction reduces the number of layers, which can speed up the build process and reduce image size.
2. Optimize the Use of COPY and RUN Commands
Efficient use of COPY and RUN commands can also help minimize the number of layers and improve caching.
Example: Optimizing COPY and RUN
Consider a typical Node.js application:
WORKDIR /app

# Copy package.json and package-lock.json separately
COPY package.json package-lock.json ./

# Install dependencies
RUN npm install

# Copy the rest of the application code
COPY . .

# Start the application
CMD ["node", "main.js"]Explanation:
- By copying only the
package.jsonandpackage-lock.jsonfiles first and runningnpm install, Docker can cache this layer. If your dependencies do not change, Docker will reuse the cached layer even if your application code changes.
3. Using .dockerignore to Exclude Unnecessary Files
To prevent copying unnecessary files such as node_modules and Docker configuration files, use a .dockerignore file. This ensures only necessary files are included in the build context, reducing the size and complexity of your image.
Example:
node_modules/
.dockerignore
Dockerfile
.gitExplanation:
- This
.dockerignorefile excludes thenode_modulesdirectory, Docker configuration files, and other unnecessary directories from the build context, ensuring a leaner and faster build.
Efficient layer caching in Docker not only speeds up the build process but also reduces the overall image size, making your deployments faster and more efficient. By minimizing the number of layers, optimizing COPY and RUN commands, and using .dockerignore effectively, you can significantly optimize your Docker builds.
Docker Multistage Builds
In our previous section, we discussed efficient caching in Docker layers and how to optimize Dockerfile structures to speed up build times and reduce image sizes. Now, let’s dive into an even more powerful technique: Docker Multistage Builds. This approach allows you to build images in multiple steps, significantly enhancing the efficiency and reducing the size of your final Docker image.
The Problem: Large, Inefficient Docker Images
The Story: Building a House
Imagine you’re an architect tasked with designing and building a house. The process involves several stages:
- Planning and Designing: Creating blueprints and models.
- Construction: Building the house based on the blueprints.
- Finishing Touches: Adding furniture, painting, and decorating.
Now, think about the tools and materials you use for each stage. During the planning stage, you need drawing tools, blueprints, and models. During construction, you need heavy machinery, bricks, and cement. For the finishing touches, you need paint, furniture, and decor.
What if you had to keep all the tools and materials from all stages inside the house, even after it’s completed? It would be cluttered, inefficient, and much harder to maintain. You want to keep only the furniture, paint, and decor, making the house livable and beautiful.
The Real-World Problem
Similarly, in software development, building a complex application involves multiple stages. Let’s consider an application developed using TypeScript:
- Development Stage: You write the TypeScript code and set up your development environment with all necessary tools and libraries.
- Build Stage: You compile the TypeScript code into JavaScript.
- Runtime Stage: You run the compiled JavaScript code in a production environment.
If you package everything from all stages into your final Docker image, it becomes bloated with unnecessary tools and libraries that are only needed during the development and build stages.
The Solution: Docker Multistage Builds
Docker Multistage Builds allow you to separate the build environment from the runtime environment, creating leaner and more efficient images. This way, you can keep only what is necessary for the final stage (runtime) and discard the rest.
Implementing Multistage Builds
Let’s see how we can apply this to our TypeScript application.
Step 1: Setting Up the Build Stage
In the build stage, you install all dependencies and compile the TypeScript code to JavaScript. This stage includes all the tools required for building the application.
Step 2: Setting Up the Runtime Stage
In the runtime stage, you only include the compiled JavaScript code and the runtime dependencies, omitting all unnecessary build tools and files. This results in a much smaller and efficient Docker image.
Example: Multistage Dockerfile for a TypeScript Application
Here’s how you can implement multistage builds in your Dockerfile:
# Build stage
FROM node:14 as builder

WORKDIR /app

# Install dependencies
COPY package.json package-lock.json ./
RUN npm install

# Copy and build the application
COPY . .
RUN npm run build

# Runtime stage
FROM node:14-alpine

WORKDIR /app

# Copy only the necessary files from the build stage
COPY --from=builder /app/dist ./dist
COPY --from=builder /app/node_modules ./node_modules
COPY --from=builder /app/package.json ./package.json

EXPOSE 3000

# Start the application
CMD ["node", "dist/main.js"]
Explanation
- Build Stage:
- FROM node:14 as builder: This starts the build stage with Node.js 14 and names it
builder. - WORKDIR /app: Sets the working directory to
/app. - COPY package.json package-lock.json ./ && RUN npm install: Copies the dependency files and installs the dependencies.
- COPY . . && RUN npm run build: Copies the application files and builds the TypeScript application.
- Runtime Stage:
- FROM node:14-alpine: Uses a smaller Node.js Alpine image for the runtime stage.
- WORKDIR /app: Sets the working directory to
/app. - COPY –from=builder /app/dist ./dist: Copies the built JavaScript files from the build stage.
- COPY –from=builder /app/node_modules ./node_modules: Copies the installed node modules from the build stage.
- COPY –from=builder /app/package.json ./package.json: Copies the package.json file.
- EXPOSE 3000: Exposes port 3000.
- CMD [“node”, “dist/main.js”]: Sets the command to start the application.
Why Use Multistage Builds?
Multistage builds offer several advantages:
- Reduced Image Size: By excluding unnecessary build tools and dependencies, the final image is significantly smaller.
- Improved Security: Smaller images have a reduced attack surface, making them more secure.
- Faster Deployments: Smaller images result in faster deployments and quicker startup times.
Docker Multistage Builds provide an efficient way to manage the different stages of your application’s lifecycle, ensuring that your final Docker image is lean and optimized for production. By separating the build and runtime stages, you can keep your images small, secure, and quick to deploy.
Conclusion
Mastering intermediate Docker concepts is essential for building efficient, scalable, and secure containerized applications. By understanding and implementing Docker networking, creating custom networks, using Docker volumes for data persistence, optimizing caching in Docker layers, and utilizing multistage builds, you can significantly enhance your Docker proficiency. These advanced techniques will help you create leaner, faster, and more secure Docker environments, ensuring your applications are robust and production-ready. Continue to explore and practice these concepts to fully harness the power of Docker in your projects.