Introduction
Welcome to the comprehensive guide on deploying Docker containers using AWS Elastic Container Service (ECS). This blog is designed for those who are new to container orchestration and want to understand the entire process from scratch. Following our previous blogs on basic and intermediate Docker concepts, we will now dive into deploying your containerized applications on the cloud using AWS ECS. This guide will walk you through the need for container orchestration, the problems it solves, and how AWS ECS can be the perfect solution for your container management needs. By the end of this guide, you will have a solid understanding of ECS and be ready to deploy your Docker containers in a scalable and efficient manner.
Topics Covered
| Topic | Description |
|---|---|
| The Need for Container Orchestration | Understanding why container orchestration is essential and the problems it solves. |
| What is AWS Elastic Container Service (ECS)? | An overview of AWS ECS and its benefits. |
| Understanding the Basics | Docker Images and Containers Amazon Elastic Container Registry (ECR) ECS Clusters ECS Task Definitions ECS Tasks and Services |
| Overview of the Deployment Flow for Docker Containers using AWS ECS | Visualizing the deployment flow step-by-step. |
| Practical Implementation: Deploying Docker Containers using AWS ECS | Detailed steps and commands to deploy your application on AWS ECS. |
The Need for Container Orchestration
As applications grow in complexity, managing and scaling containerized applications manually becomes a significant challenge. Imagine you have multiple micro-services, each running in its own Docker container. Managing these containers, ensuring they can communicate with each other, scaling them based on demand, and handling failures can quickly become overwhelming.
Real-Life Scenario
Let’s say you are a developer working on an e-commerce platform. Your application is composed of several microservices:
- Web Server: Handles incoming HTTP requests.
- Database: Stores user and product information.
- Payment Gateway: Processes payments.
- Notification Service: Sends email notifications to users.
Initially, you might run these services on your local machine or a single server. As your user base grows, you need to ensure that your services can handle increased traffic, scale seamlessly, and remain highly available. Managing this manually is not feasible and can lead to errors and downtime.
Problem Scenario
Imagine it’s Black Friday, the biggest shopping day of the year. Your e-commerce platform is receiving a massive influx of traffic. Without proper container orchestration:
- Scalability Issues: Manually scaling your services to handle the load can be error-prone and time-consuming.
- Resource Management: Ensuring that each service has enough resources (CPU, memory) without over-provisioning or under-provisioning is difficult.
- Service Discovery: As new instances of services are added, ensuring that they can find and communicate with each other can be complex.
- Health Monitoring: Detecting and replacing failed services quickly is crucial to maintain uptime.
To address these challenges, you need a robust container orchestration solution that can manage, scale, and monitor your services automatically. This is where AWS Elastic Container Service (ECS) comes into play.
What is AWS Elastic Container Service (ECS)?
AWS ECS is a highly scalable, high-performance container orchestration service that supports Docker containers. It allows you to run and manage Docker containers on a cluster of Amazon EC2 instances or using AWS Fargate, a serverless compute engine for containers.
With ECS, you can:
- Deploy: Easily deploy and manage your containerized applications.
- Scale: Automatically scale your containers up or down based on demand.
- Monitor: Monitor the health and performance of your applications.
- Secure: Ensure your applications are secure with fine-grained access control.
Understanding the Basics
Before we dive into the hands-on part of deploying Docker containers on AWS ECS, let’s cover some fundamental concepts and terms. We will use real-life examples and scenarios that you, as a developer, might encounter. This will help make these concepts more relatable and easier to understand.
1. Docker Images and Containers
Real-Life Analogy: Think of a Docker image as a recipe for baking a cake, and a Docker container as the actual baked cake.
Docker Image: A Docker image is like a recipe that contains all the instructions and ingredients needed to create a dish. It includes everything needed to run a piece of software, such as the code, runtime, libraries, and environment variables. It is a read-only template with the instructions to create a Docker container.
Docker Container: A container is the finished product, like a baked cake that you can actually eat. It is a runtime instance of a Docker image, meaning it’s an isolated environment where the application runs, based on the instructions provided in the Docker image.
Connecting the Dots: Just like you follow a recipe to bake a cake, Docker uses an image to create a container that runs your application.
2. Amazon Elastic Container Registry (ECR)
Real-Life Analogy: Think of Amazon ECR as GitHub for your Docker images. Just like you push your code to GitHub to store and share it, you push your Docker images to ECR.
Amazon ECR: Amazon ECR is a fully managed Docker container registry that makes it easy to store, manage, and deploy Docker container images. It integrates with AWS Identity and Access Management (IAM) to control who can access your images, providing a secure and scalable solution for managing Docker images.
Connecting the Dots: Just like you push your code to GitHub for version control and collaboration, you push your Docker images to ECR for storage and deployment. This makes it easy to manage and deploy your images securely.
3. ECS Clusters
Real-Life Analogy: Imagine you are organizing a large music festival. Instead of having all activities and services happening in one big, unmanaged space, you organize them into different sections (clusters), each responsible for specific tasks like ticketing, security, food stalls, and performance stages.
Need for Clusters: In a similar way, when you have multiple microservices running in Docker containers, managing each container individually becomes complex. An ECS cluster is a logical grouping of tasks or services that makes it easier to manage and organize your containers.
ECS Cluster: An ECS cluster is a logical grouping of tasks or services. You can use clusters to isolate your applications by creating separate clusters for each application or environment (e.g., development, testing, production). A cluster can include one or more container instances, which are Amazon EC2 instances or AWS Fargate tasks that run your Docker containers.
Why Multiple Containers: In a real-world application, you might have several services that need to work together, such as a web server, a database, and a cache. Each of these services can run in its own container. Grouping them into a single cluster helps you manage them more effectively.
Example Scenario:
Let’s consider an e-commerce application with the following services:
- Web Server: Handles incoming HTTP requests.
- Database: Stores and retrieves data.
- Cache: Speeds up data access by storing frequently accessed data.
By placing these containers within a single cluster, they can communicate with each other easily while still being managed separately.
Why Separate Clusters?: You might separate your clusters to better manage resources, security, and performance. For instance:
- Development Cluster: Used for developing and testing new features without affecting the production environment.
- Production Cluster: Used to run the live application, ensuring it is stable and performs well.
In practice, you might have one ECS cluster for development and another for production. The development cluster allows you to test new features and changes without impacting the live application running in the production cluster.
Connecting the Dots: Think of an ECS cluster as an organized team of volunteers at a music festival, where different sections (clusters) handle different tasks, ensuring everything runs smoothly. Each section (cluster) contains multiple stations (containers) that need to work together to provide a cohesive experience.
4. ECS Task Definitions
Real-Life Analogy: Imagine you are the head chef creating a menu for your restaurant. The task definition is like the detailed recipe that each cook follows to prepare a dish.
ECS Task Definition: A task definition is a blueprint for your application. It defines the Docker containers to be used, the resources each container will use (CPU, memory), and the networking and logging configurations. Task definitions are used to create tasks, which are the running instances of your application.
Why Needed: Task definitions provide a standardized way to define and manage the configuration of your containers. Without task definitions, you would need to manually configure each container, which can lead to inconsistencies and errors.
Connecting the Dots: Just like a detailed recipe ensures that every cook prepares a dish exactly as intended, a task definition ensures that your containers are configured and run correctly according to the specified parameters.
5. ECS Tasks and Services
Real-Life Analogy: Imagine you are managing a fleet of delivery trucks. Each truck (task) carries a specific load and follows a specific route. The overall delivery operation (service) ensures that there are always enough trucks on the road to meet delivery demands.
ECS Task: A task is the instantiation of a task definition within a cluster. It runs the containers defined in the task definition. Each task can run one or more containers, depending on the task definition.
ECS Service: An ECS service allows you to run and maintain a specified number of instances of a task definition simultaneously. Services ensure that the specified number of tasks are always running and healthy. They can optionally be configured to use an Elastic Load Balancer (ELB) to distribute traffic across the tasks.
Why Needed: Services provide a way to ensure the desired state of your application is maintained. For example, if you want to run three instances of your web server, the service will monitor and maintain that number of instances, restarting any that fail.
Connecting the Dots: Think of tasks as individual delivery trucks and services as the fleet management system that ensures there are always enough trucks on the road to meet delivery demands.
Overview of the Deployment Flow for Docker Containers using AWS ECS
In this section, I’ll provide an overview of the deployment flow for Docker containers using AWS Elastic Container Service (ECS). This will help you understand the high-level steps involved before diving into the practical implementation. You can refer to the provided image to visualize this flow.
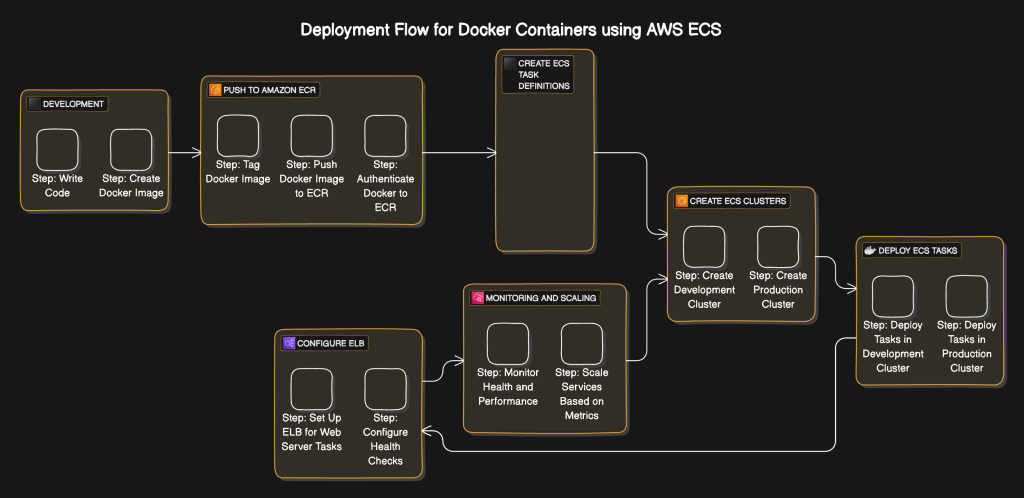
1. Development
In this step, we will write the code for your application and create a Docker image.
- Step: Write Code
- This is where you develop your application. For instance, if you are building a web application using Node.js, you will write the necessary code and structure it according to your requirements.
- Step: Create Docker Image
- After writing the code, you create a Docker image. This involves creating a Dockerfile that contains all the dependencies and instructions required to build your application. The Docker image is a portable and consistent way to package your application and its dependencies.
2. Push to Amazon ECR
Here, we will tag the Docker image with a version, authenticate Docker to ECR, and then push the image to Amazon ECR for storage and deployment.
- Step: Tag Docker Image
- What It Is: Tagging a Docker image means giving it a specific label or name, which often includes a version number or other identifier. This tag helps in identifying and managing different versions of your Docker image.
- Why It’s Needed: Tagging is essential for version control and organization. It allows you to keep track of different versions of your application. For instance, you might have tags like
v1.0,v2.0, orlatestto indicate the state of the image. - Example: If your ECR repository URI is
123456789012.dkr.ecr.us-west-2.amazonaws.com/my-web-app, and you want to tag your image asv1.0, you would use a command like:docker tag my-web-app:latest 123456789012.dkr.ecr.us-west-2.amazonaws.com/my-web-app:v1.0
- Step: Authenticate Docker to ECR
- What It Is: Authentication is the process of verifying your identity to gain access to Amazon ECR. This involves logging in to your ECR registry using Docker.
- Why It’s Needed: Authentication ensures that only authorized users can push or pull Docker images from the registry. This is a security measure to protect your images from unauthorized access.
- Example: AWS provides a command to login to ECR, which generates a token and authenticates Docker to your ECR registry:
aws ecr get-login-password --region us-west-2 | docker login --username AWS --password-stdin 123456789012.dkr.ecr.us-west-2.amazonaws.com
- Step: Push Docker Image to ECR
- What It Is: Pushing a Docker image means uploading it from your local machine to the ECR repository.
- Why It’s Needed: Pushing your Docker image to ECR makes it available for deployment on ECS. It ensures that your image is stored in a central, managed repository, from where it can be pulled by ECS tasks.
- Example: To push the tagged Docker image to ECR, you would use the following command:
bash docker push 123456789012.dkr.ecr.us-west-2.amazonaws.com/my-web-app:v1.0
3. Create ECS Task Definitions
We will create task definitions that specify how Docker containers should be configured and run in ECS.
- Define Task Specifications
- What It Is: A task definition includes the Docker image to use, CPU and memory requirements, networking mode, and environment variables. It provides the detailed configuration required to run your application in a container.
- Why It’s Needed: Task definitions standardize the configuration of your containers, ensuring consistency and reliability across different environments.
- Example: A task definition might specify that your web server container needs 512 MB of memory and should use the Docker image you pushed to ECR.
4. Create ECS Clusters
We will create clusters to logically group tasks or services for better management and organization.
- Step: Create Development Cluster
- What It Is: A development cluster is a dedicated environment for testing and developing new features without impacting the live application.
- Why It’s Needed: It provides a sandbox where you can safely test changes, experiment with new features, and debug issues.
- Example: Creating a development cluster involves setting up a group of EC2 instances or Fargate tasks specifically for development purposes.
- Step: Create Production Cluster
- What It Is: A production cluster is where your live application runs. It is designed to handle real-world traffic and ensure high availability.
- Why It’s Needed: It provides a stable and secure environment to run your application, ensuring that it performs well and is always available to users.
- Example: Creating a production cluster involves setting up a group of EC2 instances or Fargate tasks optimized for performance and reliability.
5. Deploy ECS Tasks
We will deploy the defined tasks in both development and production clusters to run your containerized applications.
- Step: Deploy Tasks in Development Cluster
- What It Is: Deploying tasks in the development cluster means launching containers based on the task definition you created, within the development environment.
- Why It’s Needed: This allows you to test your application in a real-world environment before deploying it to production.
- Example: Deploying tasks involves creating services in the development cluster that run instances of your task definition.
- Step: Deploy Tasks in Production Cluster
- What It Is: Deploying tasks in the production cluster means launching containers based on the task definition you created, within the production environment.
- Why It’s Needed: This ensures that your live application is running and accessible to end-users.
- Example: Deploying tasks involves creating services in the production cluster that run instances of your task definition.
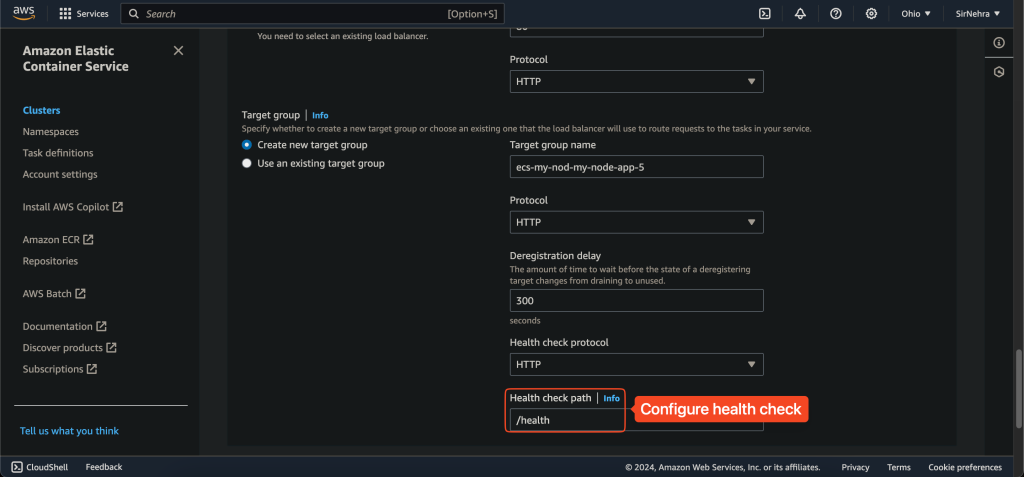
6. Configure Elastic Load Balancer (ELB)
We will set up and configure an ELB to distribute incoming traffic and ensure fault tolerance.
- Step: Set Up ELB for Web Server Tasks
- What It Is: Setting up an ELB involves configuring it to distribute incoming traffic to the web server tasks running in your ECS clusters.
- Why It’s Needed: ELB ensures that your application can handle varying levels of traffic by distributing the load evenly across multiple instances.
- Example: Configuring an ELB might involve setting up listeners and target groups that route traffic to your web server tasks.
- Step: Configure Health Checks
- What It Is: Health checks monitor the status of your web server tasks to ensure they are running correctly.
- Why It’s Needed: Health checks ensure that only healthy instances receive traffic, enhancing the reliability and availability of your application.
- Example: Configuring health checks involves specifying endpoints that the ELB can ping to verify the health of your tasks.
7. Monitoring and Scaling
We will monitor the health and performance of your services and scale them based on predefined metrics.
- Step: Monitor Health and Performance
- What It Is: Monitoring involves tracking the health and performance of your ECS tasks and services using tools like Amazon CloudWatch.
- Why It’s Needed: Monitoring helps you identify issues and ensure your application is running smoothly.
- Example: Setting up CloudWatch alarms to notify you if a task is unhealthy or if resource usage exceeds certain thresholds.
- Step: Scale Services Based on Metrics
- What It Is: Scaling involves adjusting the number of running tasks based on predefined metrics, such as CPU or memory usage.
- Why It’s Needed: Auto-scaling ensures that your application can handle varying levels of traffic efficiently without manual intervention.
- Example: Configuring auto-scaling policies to add more tasks when CPU usage is high and reduce the number of tasks when it is low.
Practical Implementation: Deploying Docker Containers using AWS ECS
In this section, we’ll go through the practical steps to deploy Docker containers using AWS ECS. We’ll start from writing the code, creating Docker images, pushing these images to Amazon ECR, and finally deploying them using AWS ECS. Additionally, we’ll observe the ECS auto-scaling feature and update the code to see how ECS handles rolling updates. Let’s get started!
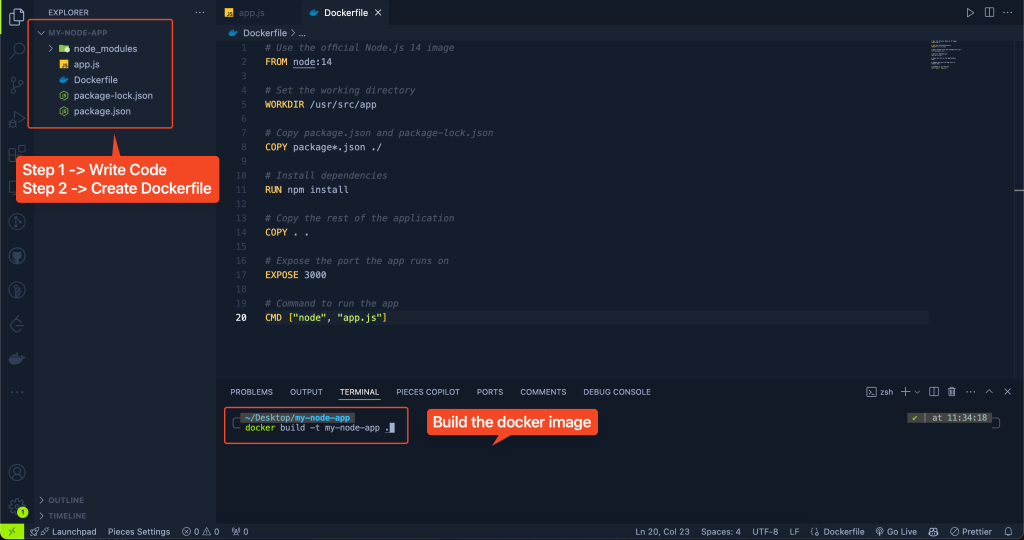
Step 1: Write Code
Before we can deploy anything, we need an application. For this example, let’s create a simple Node.js application with a health check route.
- Create a directory for your project and navigate into it:
mkdir my-node-app cd my-node-app - Initialize a new Node.js project:
npm init -y - Install Express.js:
npm install express - Create an
app.jsfile with the following content:
const express = require('express');
const app = express();
const port = 3000;

// Main route
app.get('/', (req, res) => {
  res.send('Hello World!');
});

// Health check route
app.get('/health', (req, res) => {
  res.status(200).send('Healthy');
});

app.listen(port, () => {
  console.log(`App listening at http://localhost:${port}`);
});
Step 2: Create Docker Image
Next, we’ll create a Docker image for our Node.js application.
- Create a
Dockerfilein your project directory with the following content:
# Use the official Node.js 14 image
FROM node:14

# Set the working directory
WORKDIR /usr/src/app

# Copy package.json and package-lock.json
COPY package*.json ./

# Install dependencies
RUN npm install

# Copy the rest of the application
COPY . .

# Expose the port the app runs on
EXPOSE 3000

# Command to run the app
CMD ["node", "app.js"]- Build the Docker image:
docker build -t my-node-app .
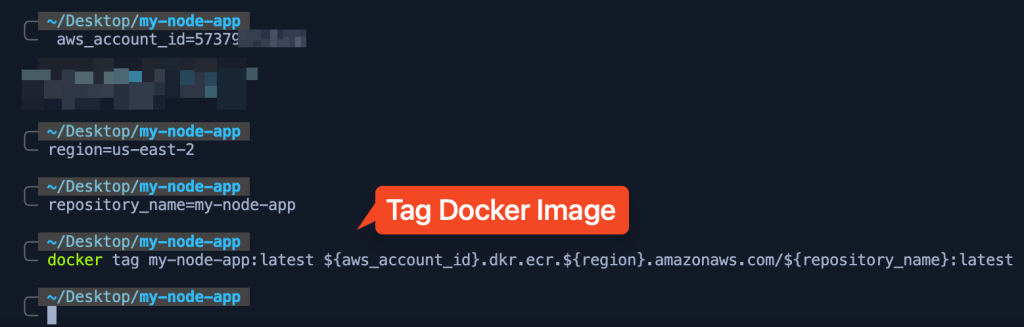
Step 3: Push to Amazon ECR
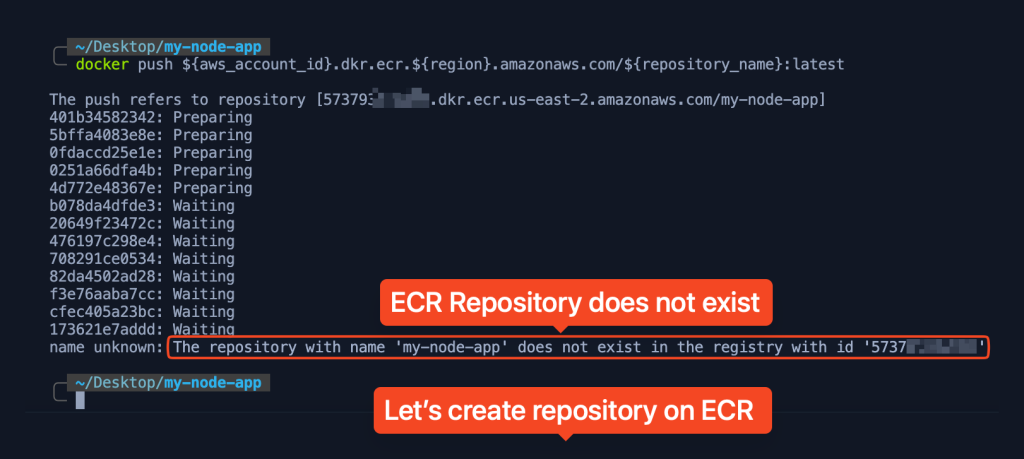
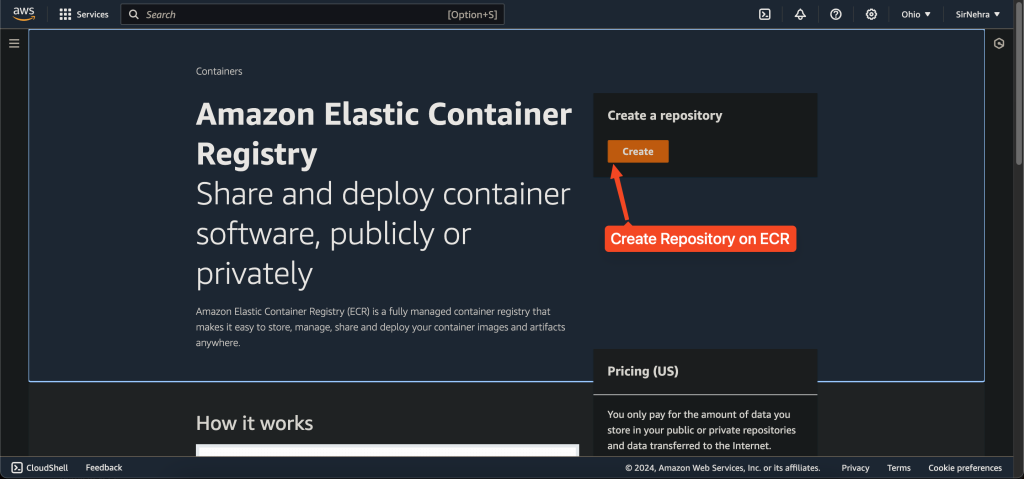
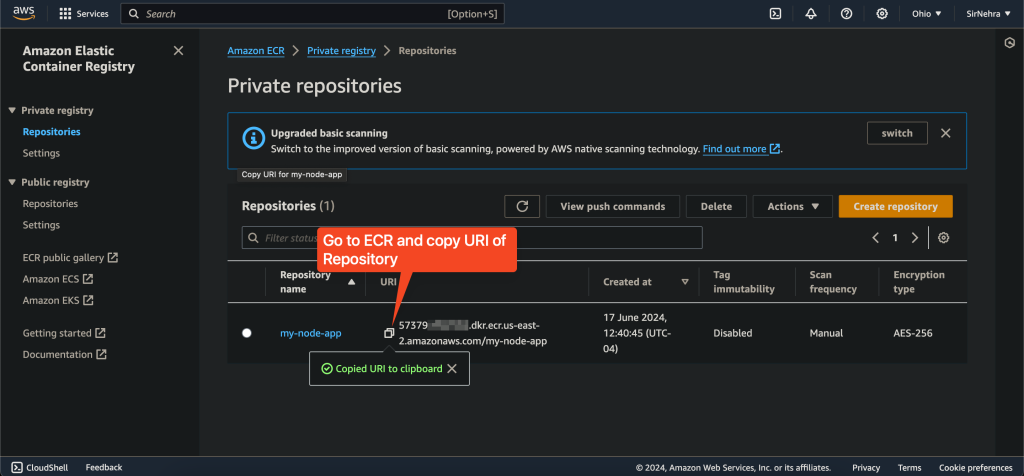
Before we can push our Docker image to Amazon ECR, we need to create a repository in ECR.
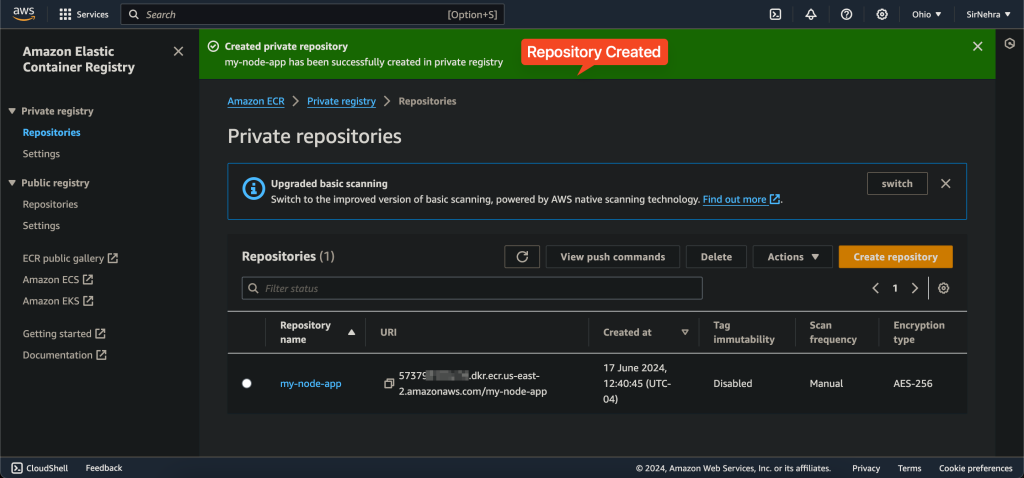
- Create ECR Repository:
Go to the Amazon ECR console, and create a new repository namedmy-node-app. - Tag Docker Image:
We need to tag our Docker image with the ECR repository URI.aws_account_id=<your_aws_account_id>
region=<your_aws_region>
repository_name=my-node-app
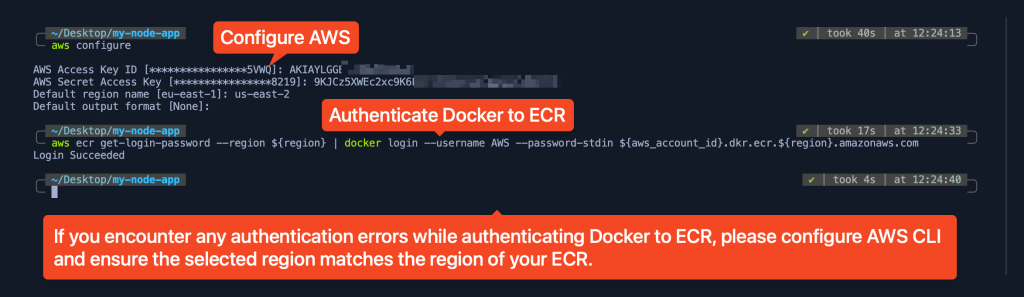
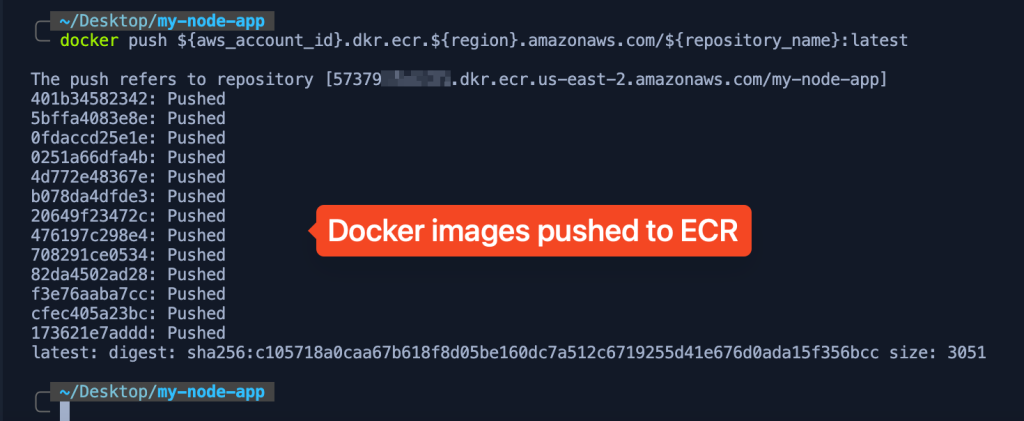
docker tag my-node-app:latest ${aws_account_id}.dkr.ecr.${region}.amazonaws.com/${repository_name}:latest - Authenticate Docker to ECR:
Get the login command from ECR and execute it.aws ecr get-login-password --region ${region} | docker login --username AWS --password-stdin ${aws_account_id}.dkr.ecr.${region}.amazonaws.com - Push Docker Image to ECR:
Push the tagged image to your ECR repository.docker push ${aws_account_id}.dkr.ecr.${region}.amazonaws.com/${repository_name}:latest
Step 4: Create ECS Task Definitions
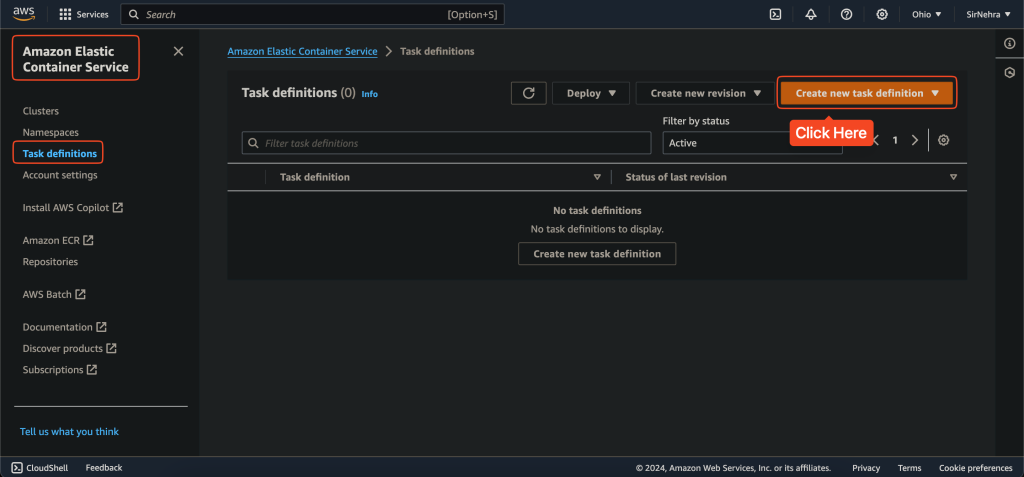
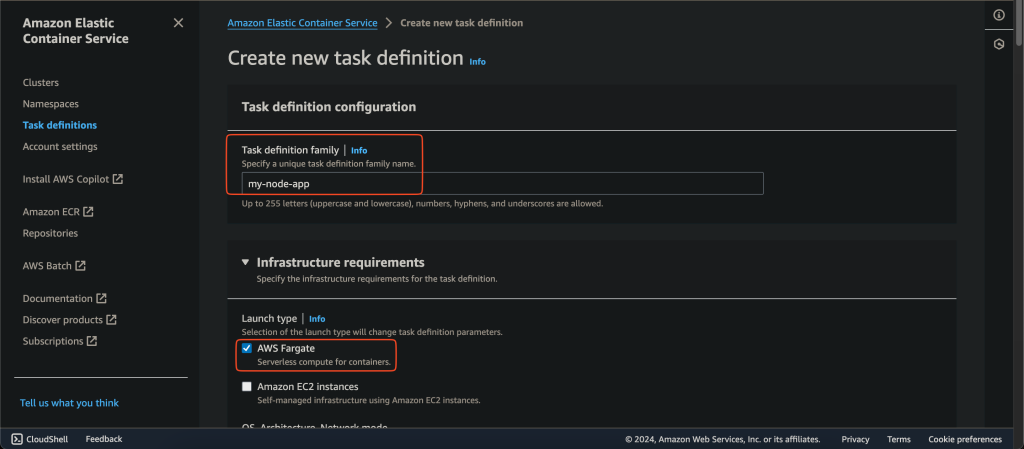
A task definition is a blueprint that describes how a Docker container should launch. Instead of using JSON files, we will use the AWS Management Console to create task definitions, which is more user-friendly for beginners.
- Open the Amazon ECS console.
- In the navigation pane, choose Task Definitions.
- Choose Create new Task Definition.
- Select Fargate as the launch type and choose Next step.
- For Task Definition Name, enter
my-node-app. - For Task execution role, select the ECS task execution role.
- For Task size, specify the task memory (e.g., 512) and task CPU (e.g., 256).
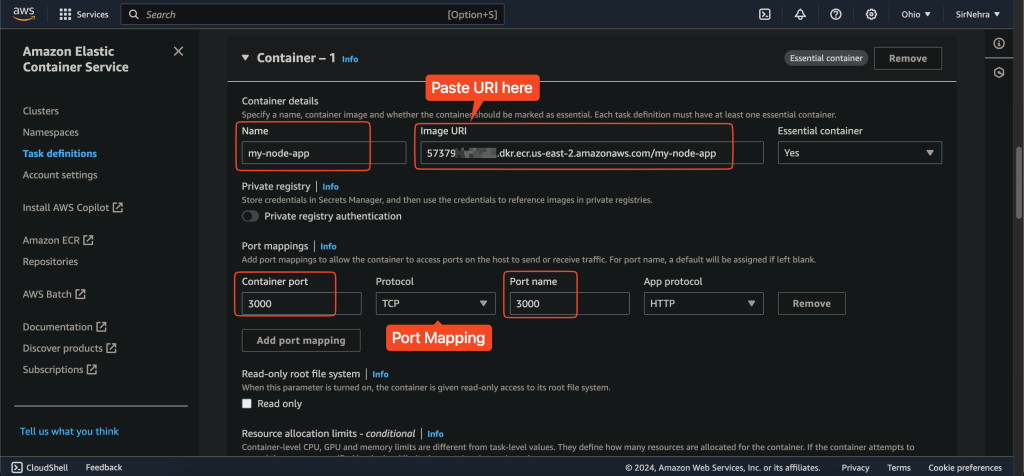
- Under Container Definitions, choose Add container:
- Container name: my-node-app
- Image:
<aws_account_id>.dkr.ecr.<region>.amazonaws.com/my-node-app:latest - Port mappings: 3000 (container port) and 3000 (host port)
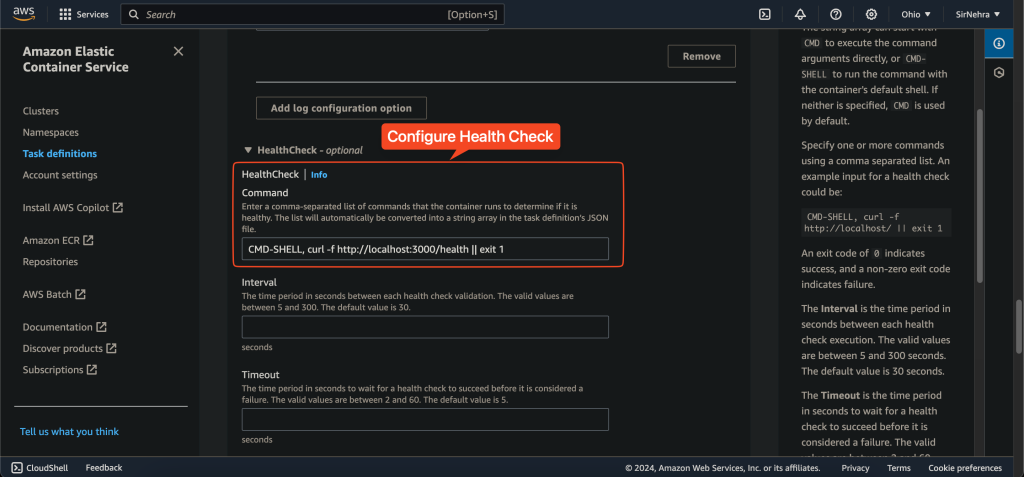
- Health check command:
["CMD-SHELL", "curl -f http://localhost:3000/health || exit 1"]
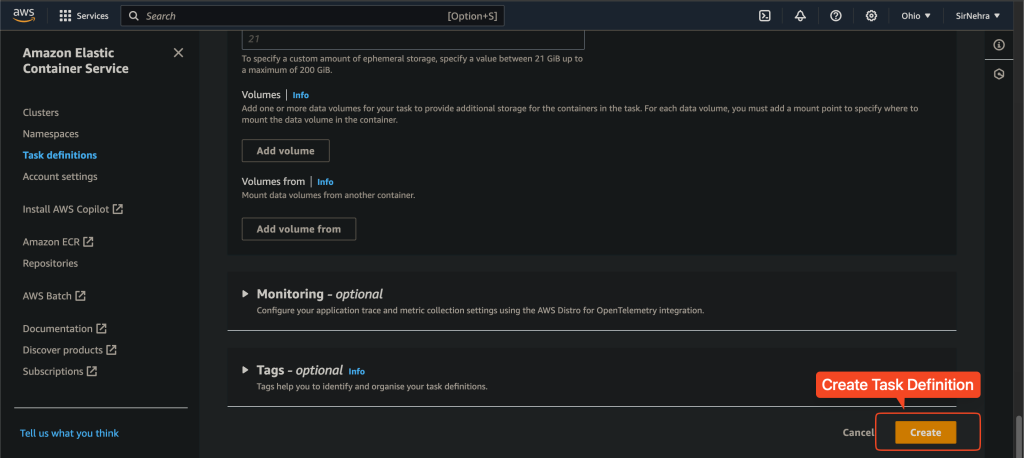
- Choose Add, and then choose Create.
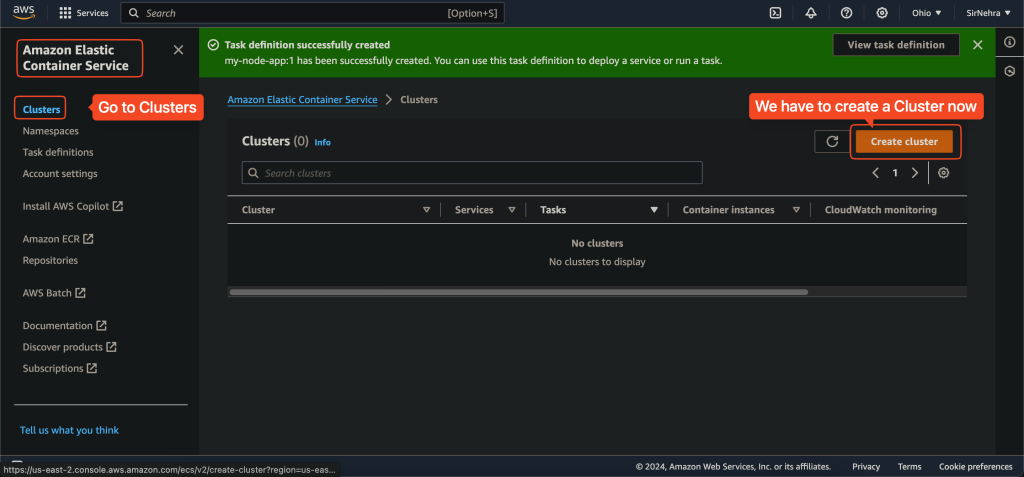
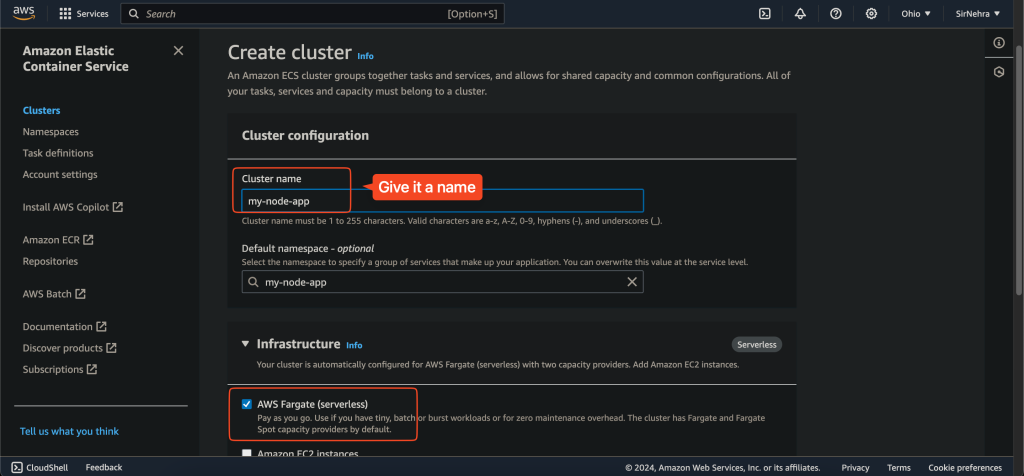
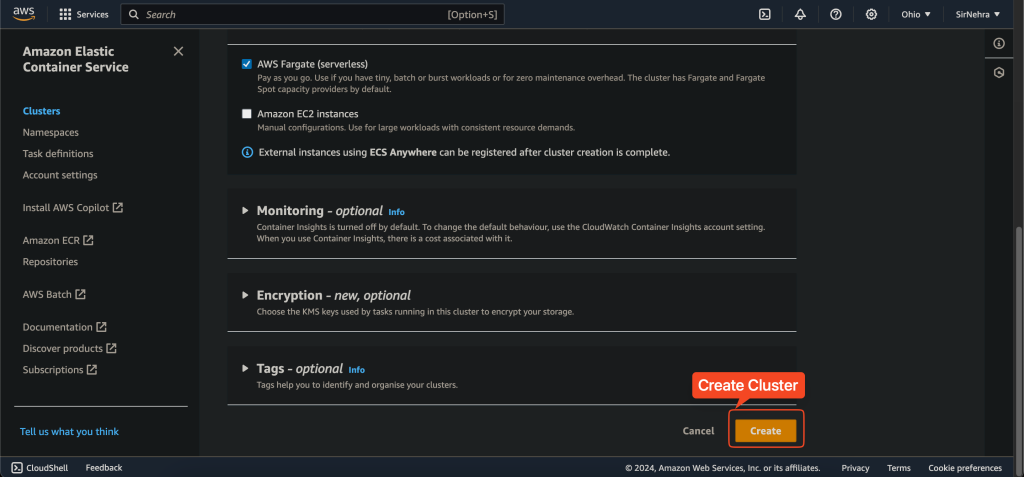
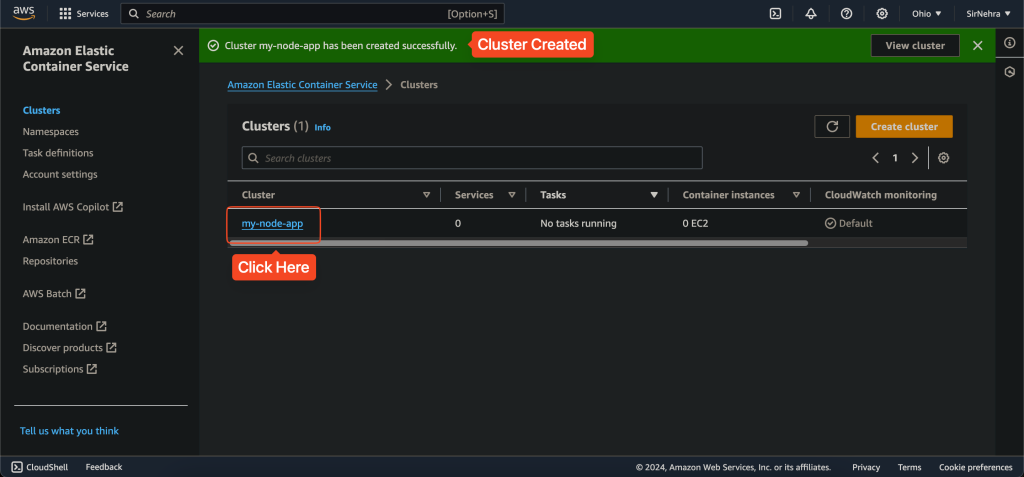
Step 5: Create ECS Clusters
Create a new ECS cluster.
- Go to the Amazon ECS console, click on “Clusters”, and create a new cluster. Choose the “Networking only” option for Fargate.
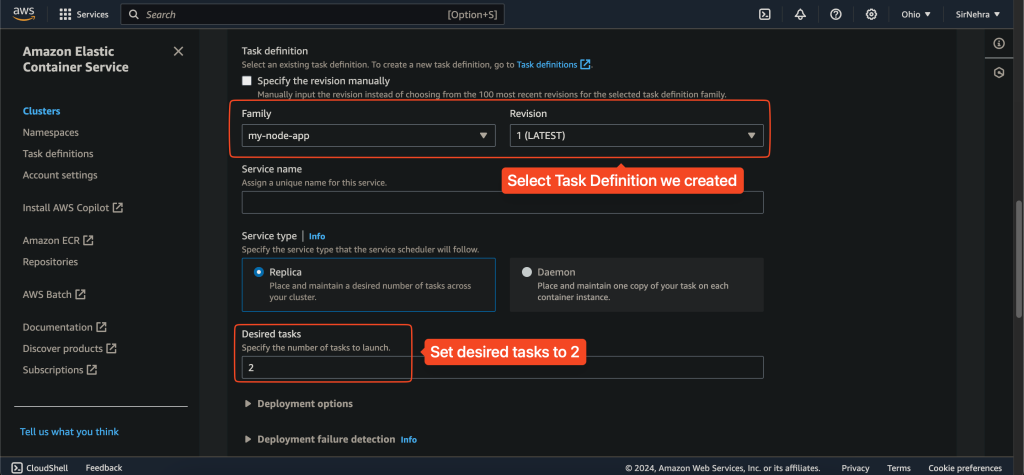
Step 6: Deploy ECS Tasks
Create a new service that uses the task definition.
- Go to the Amazon ECS console.
- Click on “Clusters” and select your newly created cluster.
- Click on “Create” under the “Services” tab.
- Choose “Fargate” as the launch type.
- Select the task definition and the cluster.
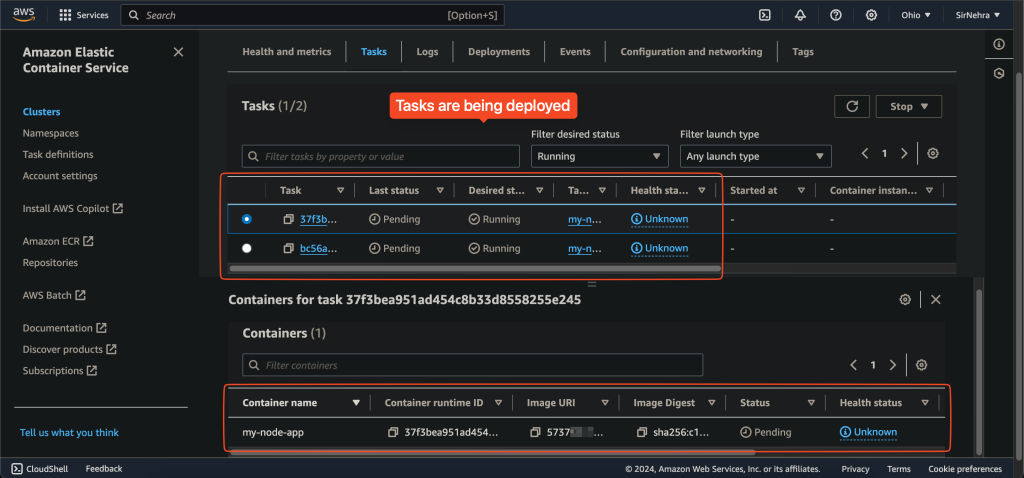
- Set the desired number of tasks to 2 to see auto-scaling in action.
- Configure the network, subnets, and security groups.
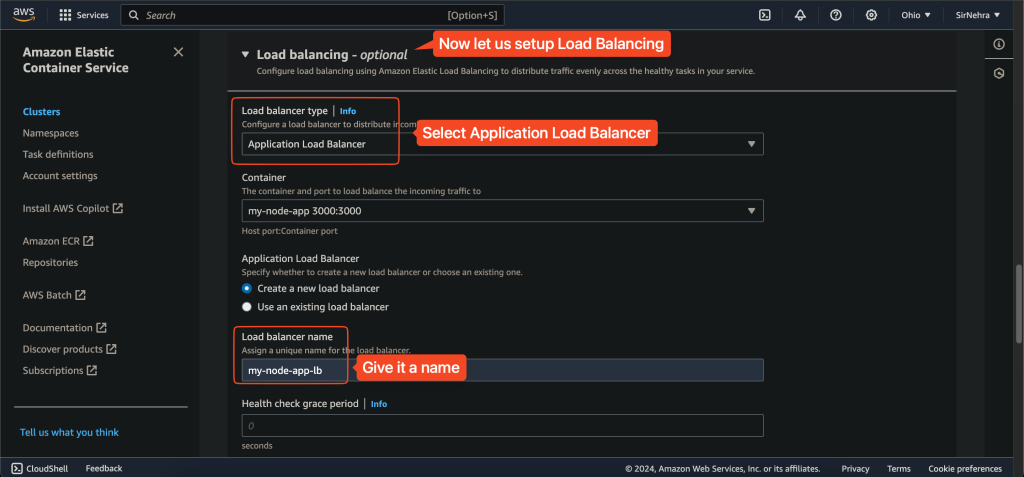
Step 7: Configure ELB
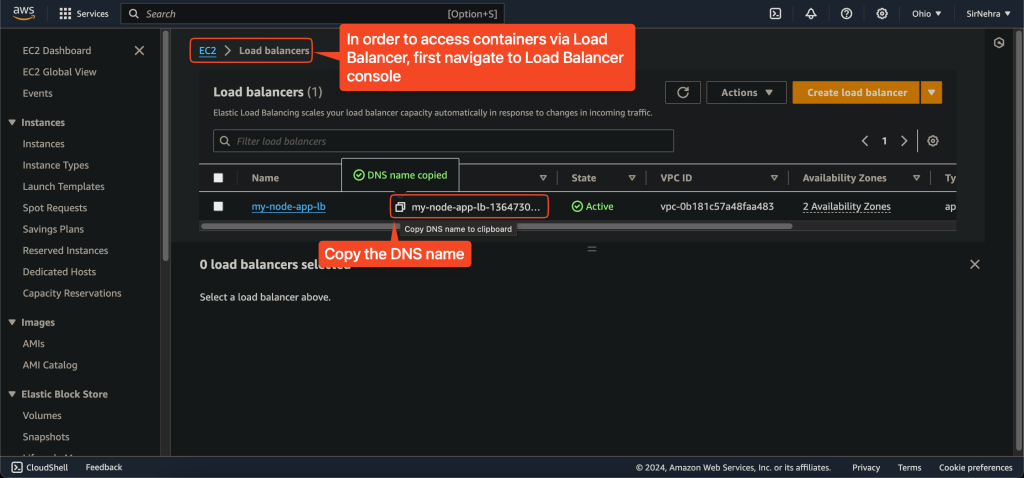
To distribute traffic to your container, you should set up an Elastic Load Balancer (ELB).
- Go to the Amazon EC2 console.
- Click on “Load Balancers” and create a new load balancer.
- Configure the load balancer to forward traffic to the ECS service.
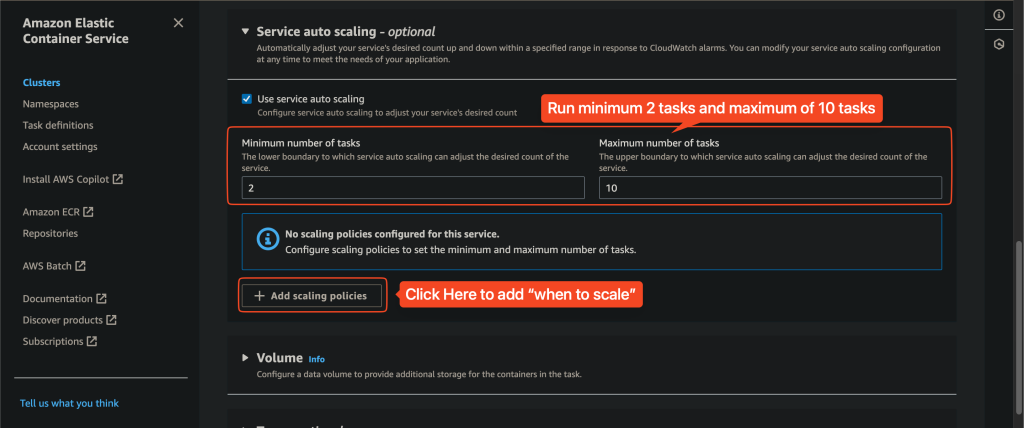
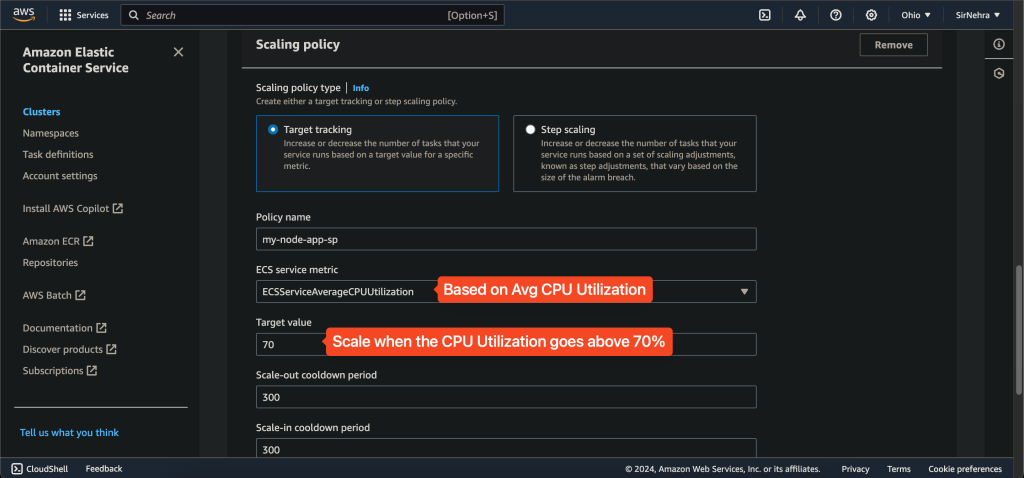
Step 8: Monitoring and Scaling
Set up CloudWatch for monitoring the health and performance of your services.
- Go to the Amazon CloudWatch console.
- Create alarms for CPU utilization, memory usage, etc.
- Configure auto-scaling policies based on these metrics.
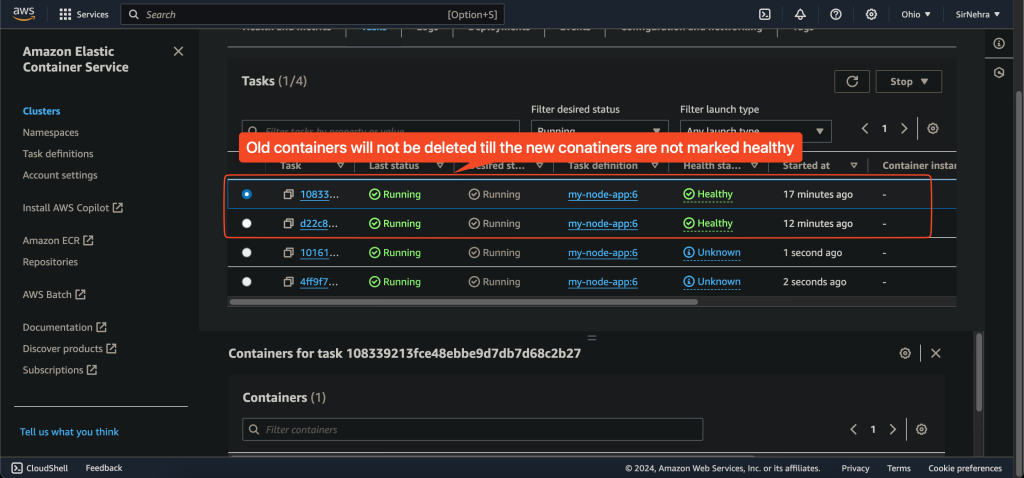
Step 9: Observing Auto-Scaling and Rolling Updates
Now, let’s see how ECS handles task health and rolling updates.
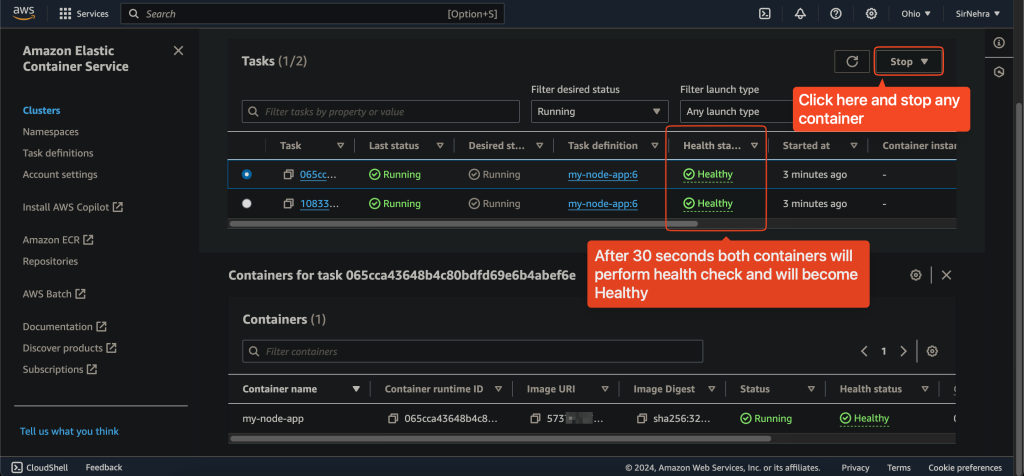
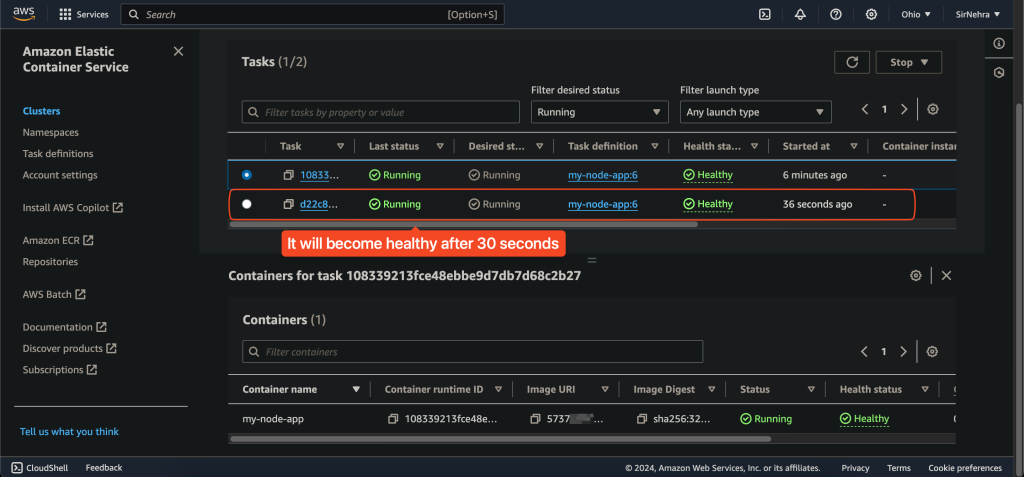
- Create Multiple Tasks and Observe Health:
- Initially, we set the desired number of tasks to 2.
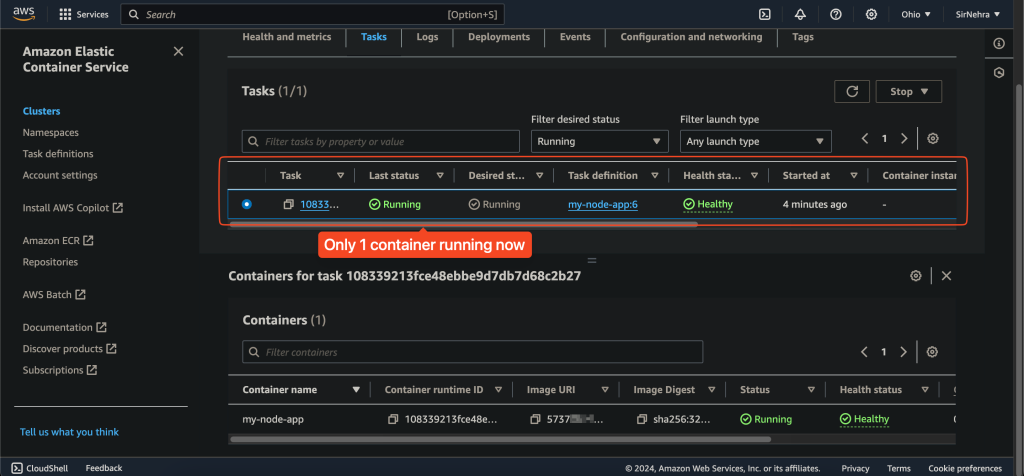
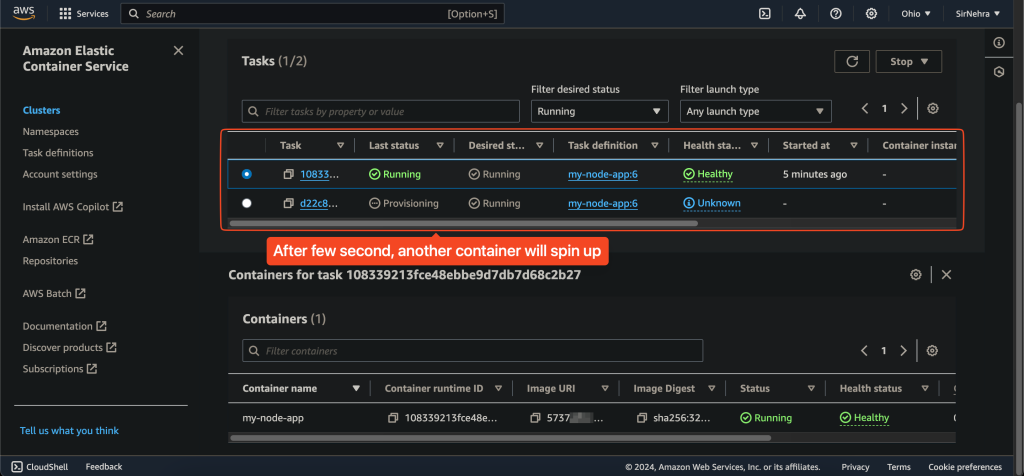
- If one of the tasks fails or is manually stopped, ECS will automatically launch a new task to replace it.
- Observation:
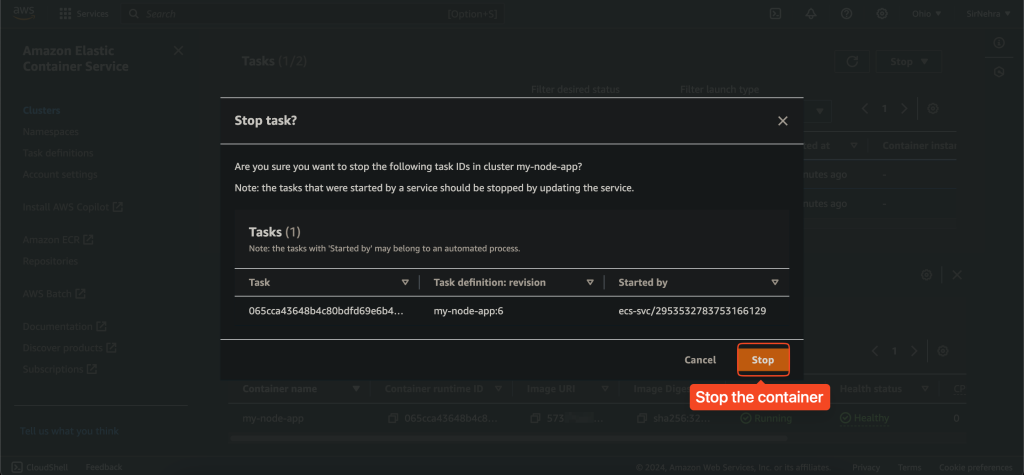
- Go to the ECS console and manually stop one of the tasks.
- ECS should automatically start a new task to maintain the desired number of tasks.
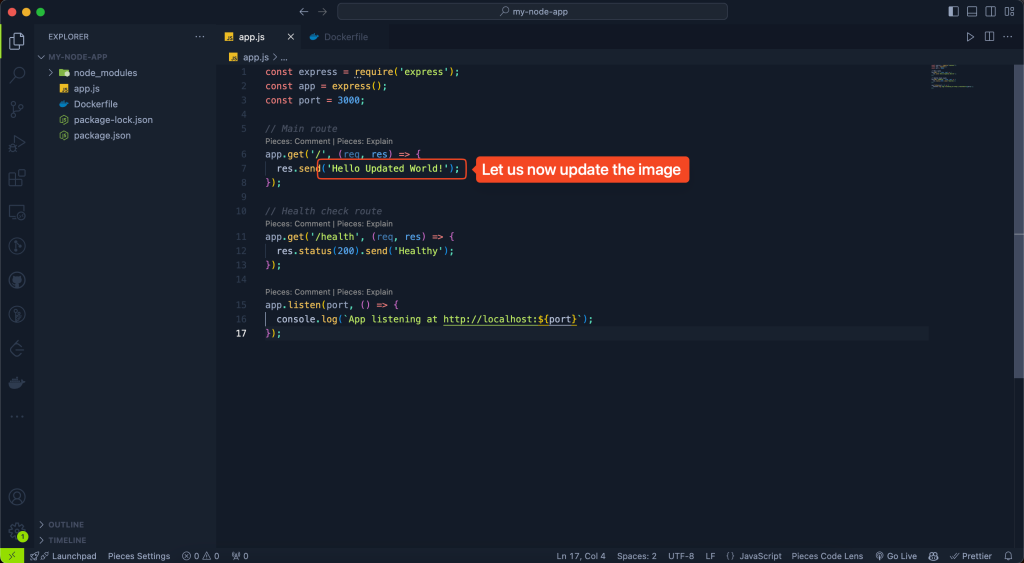
- Update the Code and Perform a Rolling Update:
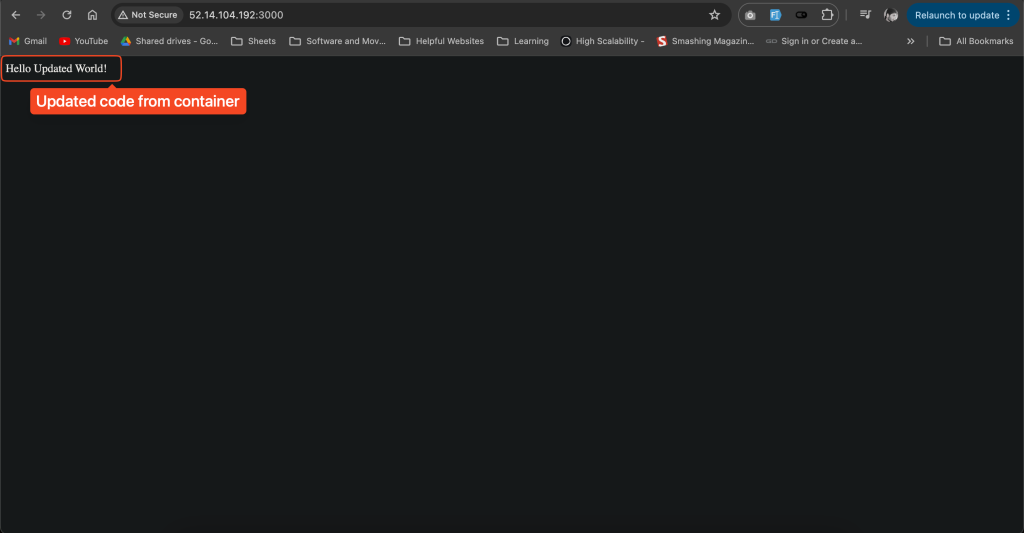
- Make a small change to your
app.jsfile. For example, change the main route message:javascript app.get('/', (req, res) => { res.send('Hello Updated World!'); }); - Rebuild the Docker Image:
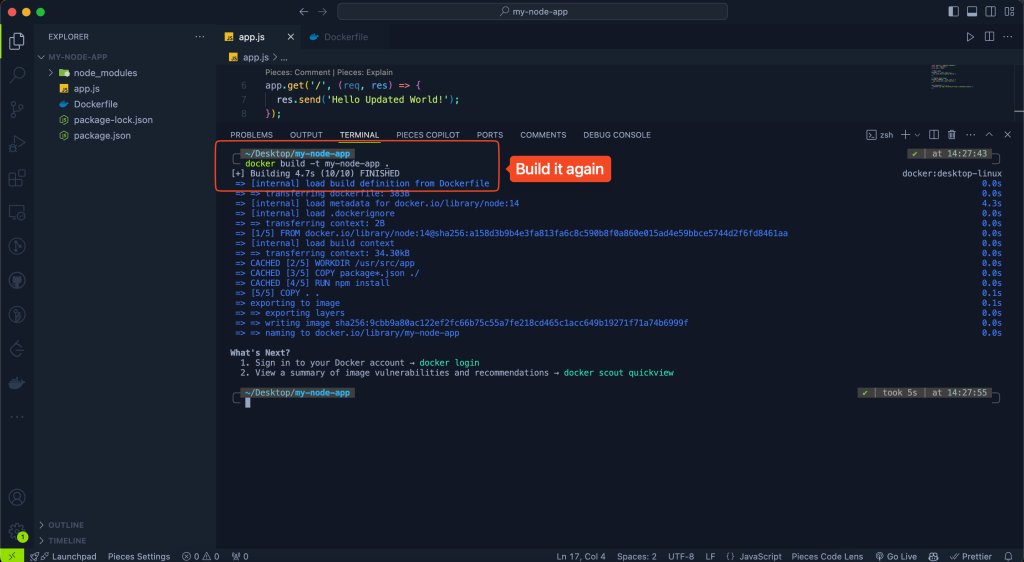
bash docker build -t my-node-app .
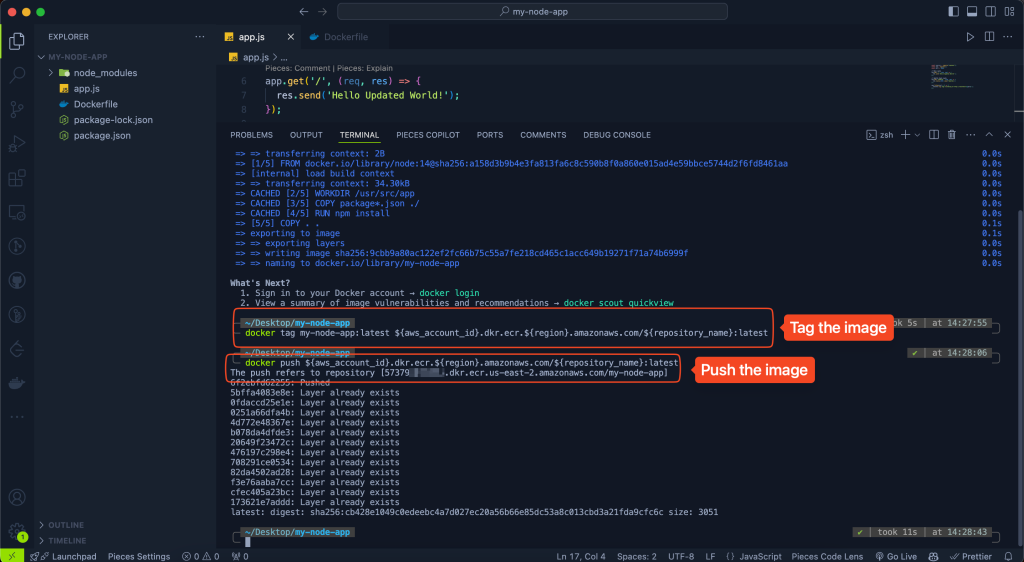
docker tag my-node-app:latest ${aws_account_id}.dkr.ecr.${region}.amazonaws.com/${repository_name}:latest
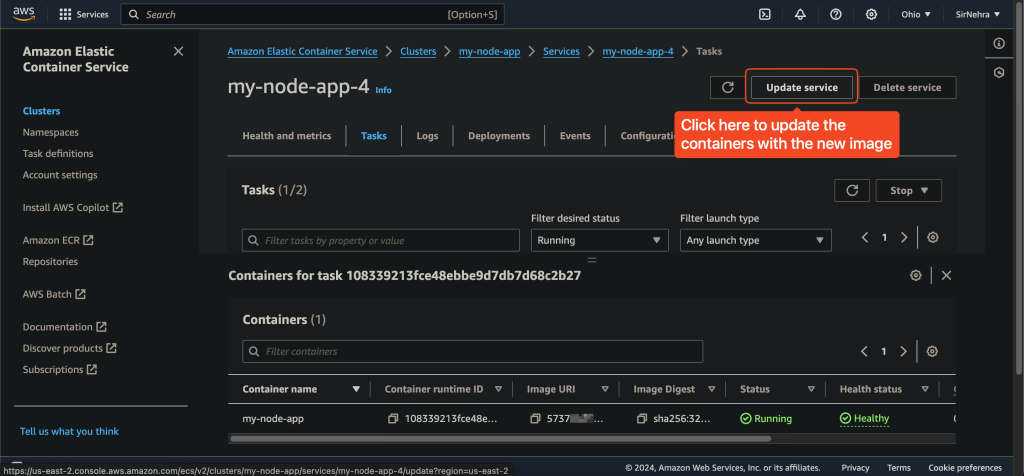
docker push ${aws_account_id}.dkr.ecr.${region}.amazonaws.com/${repository_name}:latest - Update the ECS Service:
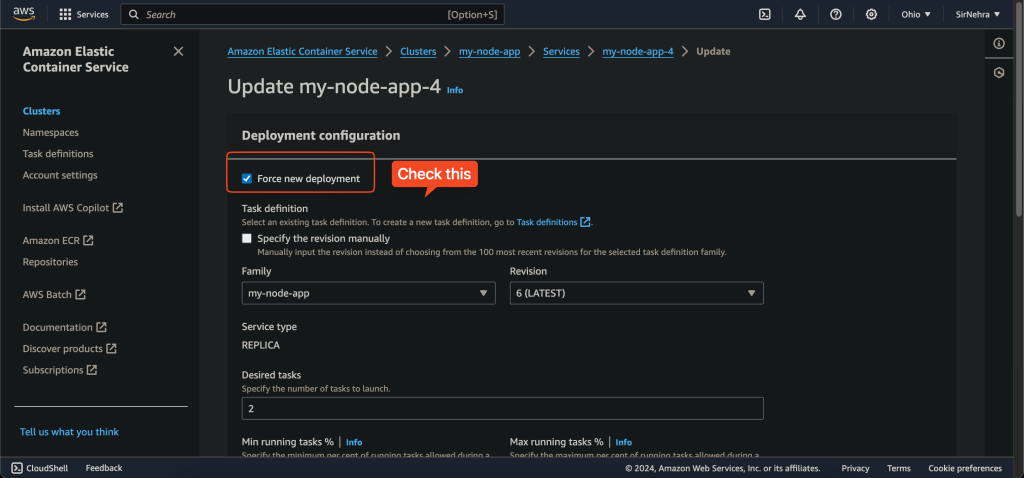
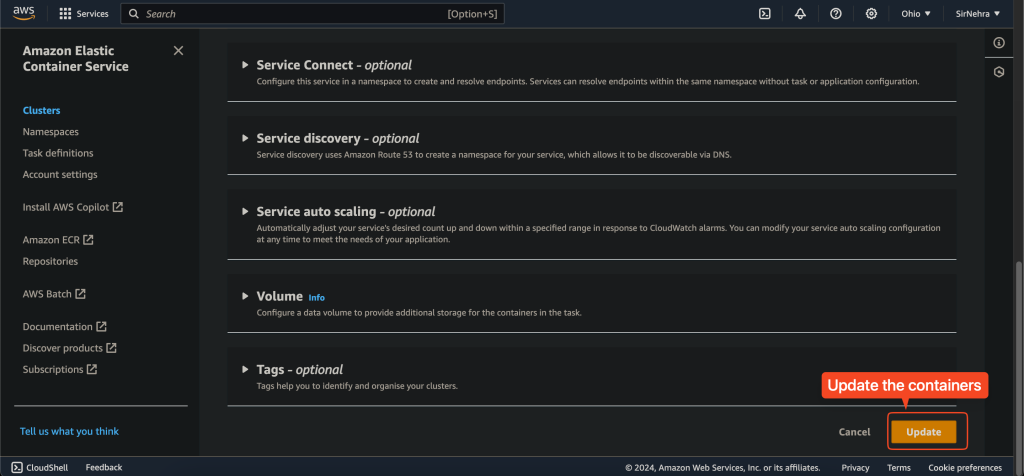
- Go to the ECS console, select your service, and click on “Update”.
- Choose to force a new deployment. ECS will start updating tasks with the new image.
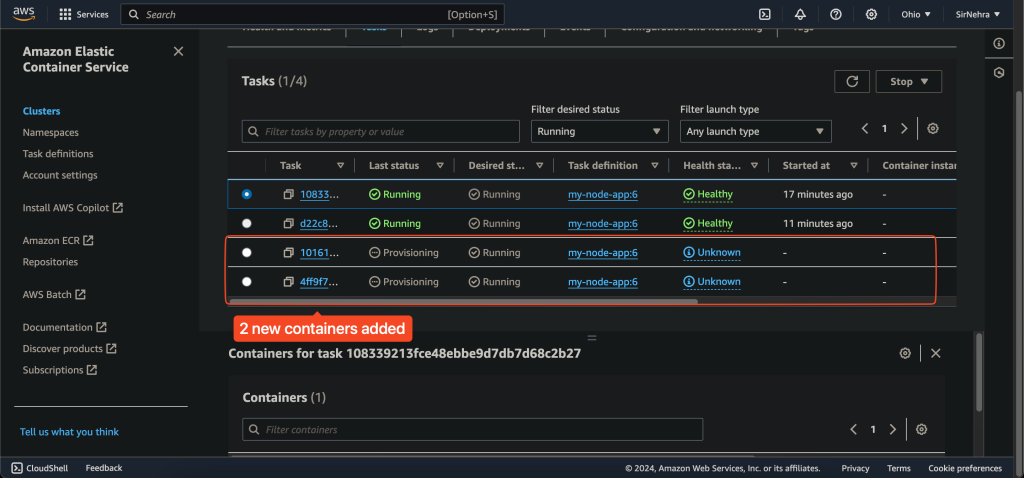
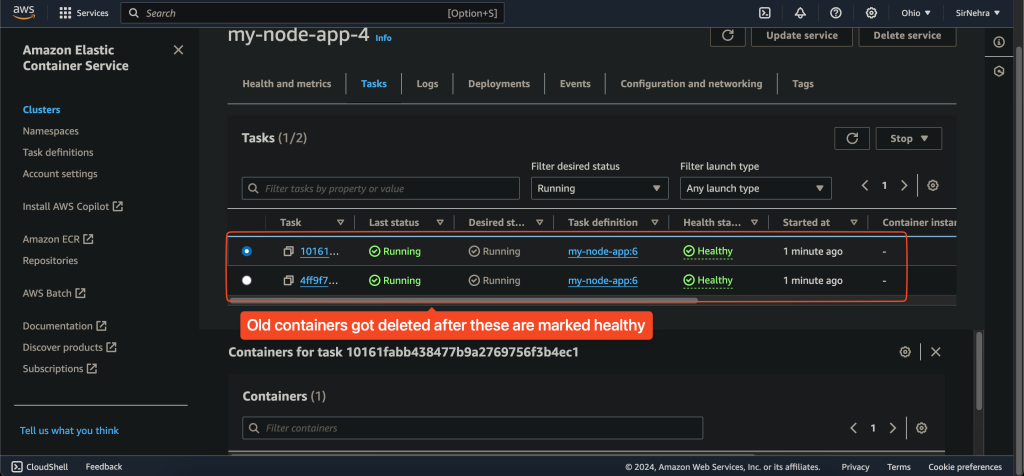
- Observation:
- Initially, the old version of the application will continue to run.
- As the new tasks become healthy, ECS will replace the old tasks with the new ones.
- Monitor the ELB endpoint to see the transition from the old message to the updated message.
- Make a small change to your
By following these steps, you will successfully deploy your Docker containers using AWS ECS, observe the auto-scaling feature, and perform a rolling update. This setup ensures that your application is scalable, highly available, and easy to manage.
Practical Lab on AWS


Conclusion
Deploying Docker containers using AWS Elastic Container Service (ECS) provides a robust and scalable solution for managing your containerized applications. By following this guide, you’ve learned the essentials of container orchestration, the benefits of using ECS, and the detailed steps required to move your applications to the cloud.
From understanding Docker images and containers to pushing images to Amazon ECR and setting up ECS clusters, task definitions, and services, you now have a solid foundation to ensure your applications are scalable, highly available, and easy to manage. With this knowledge, you’re well-equipped to handle the complexities of modern application deployment and take full advantage of the power and flexibility of AWS ECS.